Arguments to Python generator functions

Posted on Tue 14 March 2017 in Code • Tagged with Python, generators, functions, arguments, closuresLeave a comment

In Python, a generator function is one that contains a yield statement inside the function body. Although this language construct has many fascinating use cases (PDF), the most common one is creating concise and readable iterators.

A typical case

Consider, for example, this simple function:

def multiples(of):
    """Yields all multiples of given integer."""
    x = of
    while True:
        yield x
        x += of

which creates an (infinite) iterator over all multiples of given integer. A sample of its output looks like this:

>>> from itertools import islice
>>> list(islice(multiples(of=5), 10))
[5, 10, 15, 20, 25, 30, 35, 40, 45, 50]

If you were to replicate in a language such as Java or Rust — neither of which supports an equivalent of yield — you’d end up writing an iterator class. Python also has them, of course:

class Multiples(object):
    """Yields all multiples of given integer."""

    def __init__(self, of):
        self.of = of
        self.current = 0

    def __iter__(self):
        return self

    def next(self):
        self.current += self.of
        return self.current

    __next__ = next  # Python 3

but they are usually not the first choice1.

It’s also pretty easy to see why: they require explicit bookkeeping of any auxiliary state between iterations. Perhaps it’s not too much to ask for a trivial walk over integers, but it can get quite tricky if we were to iterate over recursive data structures, like trees or graphs. In yield-based generators, this isn’t a problem, because the state is stored within local variables on the coroutine stack.

Lazy!

It’s important to remember, however, that generator functions behave differently than regular functions do, even if the surface appearance often says otherwise.

The difference I wanted to explore in this post becomes apparent when we add some argument checking to the initial example:

def multiples(of):
    """Yields all multiples of given integer."""
    if of < 0:
        raise ValueError("expected a natural number, got %r" % (of,))

    x = of
    while True:
        yield x
        x += of

With that if in place, passing a negative number shall result in an exception. Yet when we attempt to do just that, it will seem as if nothing is happening:

>>> m = multiples(-10)
>>>

And to a certain degree, this is pretty much correct. Simply calling a generator function does comparatively little, and doesn’t actually execute any of its code! Instead, we get back a generator object:

>>> m
<generator object multiples at 0x10f0ceb40>

which is essentially a built-in analogue to the Multiples iterator instance. Commonly, it is said that both generator functions and iterator classes are lazy: they only do work when we asked (i.e. iterated over).

Getting eager

Oftentimes, this is perfectly okay. The laziness of generators is in fact one of their great strengths, which is particularly evident in the immense usefulness of theitertools module.

On the other hand, however, delaying argument checks and similar operations until later may hamper debugging. The classic engineering principle of failing fast applies here very fittingly: any errors should be signaled immediately. In Python, this means raising exceptions as soon as problems are detected.

Fortunately, it is possible to reconcile the benefits of laziness with (more) defensive programming. We can make the generator functions only a little more eager, just enough to verify the correctness of their arguments.

The trick is simple. We shall extract an inner generator function and only call it after we have checked the arguments:

def multiples(of):
    """Yields all multiples of given integer."""
    if of < 0:
        raise ValueError("expected a natural number, got %r" % (of,))

    def multiples():
        x = of
        while True:
            yield x
            x += of

    return multiples()

From the caller’s point of view, nothing has changed in the typical case:

>>> multiples(10)
<generator object multiples at 0x110579190>

but if we try to make an incorrect invocation now, the problem is detected immediately:

>>> multiples(-5)
Traceback (most recent call last):
  File "<pyshell#2>", line 1, in <module>
    multiples(of=-5)
  File "<pyshell#0>", line 4, in multiples
    raise ValueError("expected a natural number, got %r" % (of,))
ValueError: expected a natural number, got -5

Pretty neat, especially for something that requires only two lines of code!

The last (micro)optimization

Indeed, we didn’t even have to pass the arguments to the inner (generator) function, because they are already captured by the closure.

Unfortunately, this also has a slight performance cost. A captured variable (also known as a cell variable) is stored on the function object itself, so Python has to emit a different bytecode instruction (LOAD_DEREF) that involves an extra pointer dereference. Normally, this is not a problem, but in a tight generator loop it can make a difference.

We can eliminate this extra work2 by passing the parameters explicitly:

    # (snip)

    def multiples(of):
        x = of
        while True:
            yield x
            x += of

    return multiples(of)

This turns them into local variables of the inner function, replacing the LOAD_DEREF instructions with (aptly named) LOAD_FAST ones.


  1. Technically, the Multiples class is here is both an iterator (because it has the next/__next__ methods) and iterable (because it has __iter__ method that returns an iterator, which happens to be the same object). This is common feature of iterators that are not associated with any collection, like the ones defined in the built-in itertools module

  2. Note that if you engage in this kind of microoptimizations, I’d assume you have already changed your global lookup into local ones :) 

Continue reading

The “let” type trick in Rust

Posted on Wed 01 February 2017 in Code • Tagged with Rust, types, pattern matchingLeave a comment

Here’s a neat little trick that’s especially useful if you’re just starting out with Rust.

Because the language uses type inference all over the place (or at least within a single function), it can often be difficult to figure out the type of an expression by yourself. Such knowledge is very handy in resolving compiler errors, which may be rather complex when generics and traits are involved.

The formula itself is very simple. Its shortest, most common version — and arguably the cleverest one, too — is the following let binding:

let () = some_expression;

In virtually all cases, this binding will cause a type error on its own, so it’s not something you’d leave permanently in your regular code.

But the important part here is the exact error message you get:

error[E0308]: mismatched types
  --> <anon>:42:13
   |
42 |         let () = some_expression;
   |             ^^ expected f64, found ()
   |
   = note: expected type `f64`
   = note:    found type `()`

The type expected by Rust here (in this example, f64) is also the type of some_expression. No more, no less.

There is nothing particularly wrong with using this technique and not caring too much how it works under the hood. But if you do want to know a little more what exactly is going on here, the rest of this post covers it in some detail.

The unit

Firstly, you may be wondering about this curious () type that the compiler has apparently found in the statement above. The official name for it is the unit type, and it has several notable characteristics:

  1. There exists only one value1 of this type: () (same symbol as the type itself).
  2. It represents an empty tuple and has therefore the size of zero.
  3. It is the type of any expression that’s turned into a statement.

That last fact is particularly interesting, as it makes () appear in error messages that are more indicative of syntactic mishaps rather than mismatched types:

fn positive_signum(x: i32) -> i32 {
    if x > 0 { 1i32 }
    0i32
}
error[E0308]: mismatched types
 --> <anon>:2:17
  |
2 |     if x > 0 { 1i32 }
  |                ^^^^ expected (), found i32
  |
  = note: expected type `()`
  = note:    found type `i32`

If you think about it, however, it makes perfect sense. The last expression inside a function body is the return value. This also means that everything before it has to be a statement: an expression of type ().

Working its way backward, Rust will therefore expect only such expressions before the final 0i32. This, in turn, puts the same constraint on the body of the if statement. The expression 1i32 (with its type of i32) clearly violates it, causing the above error2.

Expanded” version

A natural question now arises: is () inside of the let () = ... formula a type () or a value ()?…

To answer that, it’s quite helpful to compare and contrast the original binding with its longer “equivalent”:

let _: () = some_expression;

This statement is conceptually very similar to our original one. The error message it causes can also be used to debug issues with type inference.

Despite some cryptic symbols, the syntax here should also be more familiar. It occurs in many typical, ordinary bindings you can see in everyday Rust code. Here’s an example:

let x: i32 = 42;

where it’s abundantly clear that i32 is the type of variable x.

Analogously above, you can see that an unnamed symbol (_, the underscore) is declared to be of type ().

So in this alternate phrasing, () denotes a type.

Let a pattern emerge

What about the original form, let () = ...? There is no explicit type declaration here (i.e. no colon), and a pair of empty parentheses isn’t a name that could be assigned a new value.

What exactly is happening there, then?…

Well, it isn’t really anything special. While it may look exceptional, and totally unlike common usages of let, it is in fact exactly the same thing as a mundane let x = 5. The potential misconception here is about the exact meaning of x.

The simple version is that it’s a name for the bound expression.
But the actual truth is that it’s a pattern which is matched against that expression.

The terms “pattern” and “matching” here refer to the same mechanism that occurrs within the match statement. You could even imagine a peculiar form of desugaring, where a let statement is converted into a semantically equivalent match:

fn original() -> i32 {
    let x = 5;
    let y = 6;
    x + y
}

fn desugared() -> i32 {
    match 5 {
        x => match 6 {
            y => x + y
        }
    }
}

This analogy works perfectly3, because the patterns here are irrefutable: any value can match them, as all we’re doing is giving the value a name. Should the case be any different, Rust would reject our let statement — just like it rejects a match block that doesn’t include branches for all possible outcomes.

An empty pattern

But just because a pattern has to always match the expression, it doesn’t mean only simple identifiers like x or y are permitted in let. If Rust is able to statically ensure a match, it is perfectly OK to use a pattern with an internal structure4:

use std::num::Wrapping;
let Wrapping(x) = Wrapping(42);

Of course, something like this is just superfluous and silly. Same mechanism, however, is also behind the ability to “initialize multiple variables”:

let (x, y) = (0, 1);

What really happens is that we take a tuple expression (0, 1) and match it against a pattern (x, y). Because it is trivially satisified, we have the symbols x and y bound to the tuple elements. For all intents and purposes, this is equivalent to having two separate let statements:

let x = 0;
let y = 1;

Of course, a 2-tuple is not the only pattern of this kind we can use in let. Others possible patterns include, for example, the 0-tuple.

Or, as we express it in Rust, ():

let () = ();

Now that’s a truly useless statement! But it also harkens straight to our debug binding. It should be pretty clear now how it works:

  • The () stanza on the left is neither a type nor a name, but a pattern.
  • The expression on the right is being matched against this pattern.
  • Because the types of both of those things differ, the compiler signals an appropriate error.

The curious thing is that there is nothing inherently magical about using () on the left hand side. It’s simply the shortest pattern we can put after let. It’s also one that’s extremely unlikely to actually match the right hand side, which ensures we get the desired error. But if you substituted something equally exotic and rare — say, (x, ((y, z), Wrapping(w))) — it would work equally well as a rudimentary type detector.

Except for one thing, of course: nobody wants to type this much! Borne out of this frugality (and/or laziness), a custom thus emerged to use ().

Short, sweet, and clever.


  1. A more formal, type-theoretic formulation of this fact is saying that () is inhabited by only one value. 

  2. In case you are wondering, one possible fix here is to return 1i32; inside the if. An (arguably more idiomatic) alternative is to put 0i32 in an else branch, turning the entire if construct into the last — and only — expression in the function body. 

  3. Note how each nested match is also introducing a new scope, exactly like the canonical desugaring of let which is often used to explain lifetimes and borrowing. 

  4. Unfortunately, Rust isn’t currently capable of proving that the pattern is irrefutable in all obvious cases. For example, let Some(x) = Some(42); will be rejected due to the existence of a None variant in Option, even though it isn’t actually used in the (constant) expression on the right. 

Continue reading

Better location for unit tests in Rust

Posted on Fri 06 January 2017 in Code • Tagged with Rust, unit tests, testing, modulesLeave a comment

For a unit test to be comprehensive, it must often access some private symbols from the module it checks.

In Rust, this is permitted for submodules: they can freely refer to anything defined “upwards” in the module hierarchy. The only requirement is that they import it explicitly by name, using statements such as use super::foo.

To illustrate this, here’s an example of a ridiculously well-factored FizzBuzz along with its accompanying unit test:

use std::borrow::Cow;

pub fn fizzbuzz(n: u32) {
    for i in 1..n+1 {
        println!("{}", fizzbuzz_string(i));
    }
}

fn fizzbuzz_string(i: u32) -> Cow<'static, str> {
    let by3 = i % 3 == 0;
    let by5 = i % 5 == 0;
    if by3 && by5 { "FizzBuzz".into() }
    else if by3   { "Fizz".into() }
    else if by5   { "Buzz".into() }
    else          { format!("{}", i).into() }
}


#[cfg(test)]
mod tests {
    use super::fizzbuzz_string;

    #[test]
    fn single_numbers() {
        assert_eq!("1", fizzbuzz_string(1));
        assert_eq!("2", fizzbuzz_string(2));
        assert_eq!("Fizz", fizzbuzz_string(3));
        assert_eq!("Buzz", fizzbuzz_string(5));
        assert_eq!("7", fizzbuzz_string(7));
        assert_eq!("Fizz", fizzbuzz_string(9));
        assert_eq!("Buzz", fizzbuzz_string(10));
        assert_eq!("FizzBuzz", fizzbuzz_string(15));
        # etc.
    }
}

The internal function, as shown above, can be imported and verified independently of the public one. This is done through a #[test] procedure in an inline submodule.

Such factorization and granular testing is commonplace, especially when the public API may cause unwanted side effects, such as printing stuff to stdout here.

The issue of length

But if you are like me and prefer your modules to be short and sweet, you may feel justifiably concerned about this inline submodule business.

In the toy example above, tests have already taken at least as many lines as the actual code. Real world usually matches this ratio. A module with a couple hundred lines of regular code starts to be measured in KLOCs if we also include its tests.

While this could be taken as a strong hint to split things up, it can just as easily disincentivize testing instead.

The obvious solution is to move those tests somewhere else. What is not so evident is how to preserve this crucial module-submodule relation, enabling us to write comprehensive tests in the first place.

Looking for inspiration

I must quickly disappoint anyone who would like to round up all their unit tests and sequester them in some distant tests/ directory. Such layout is reserved for crate-level (“integration”) tests. Unit tests, on the other hand, are predestined to live among production code1.

So let’s at least relocate them to separate files.

To make this goal more concrete, we will try to emulate the project layout described in Google’s C++ style guide. By this convention, a conceptual “module” or “unit” consists of the following files:

  • foo.h
  • foo.cc
  • foo_test.cc

Translating this to Rust, we get:

  • foo.rs
  • foo_test.rs

The first one is obviously our production code. The second file, foo_test.rs, contains all the tests we would previously put in the mod tests { } construct.

Seems pretty clean and straightforward, right? Unfortunately, Rust will not accept this setup without some convincing.

Family problems

To understand why, recall that the mere presence of some .rs files is not enough for the Rust compiler to care. If we want them picked up and included in the project, we also need to add some module declarations first.

In other words, there must also be a mod.rs file in this directory, containing at the very least the following content:

// (mod.rs)

mod foo;
#[cfg(test)]
mod foo_test;

Now it should be clearer that something is wrong.

We got two modules here, but they are siblings. Both foo and foo_test are on the same level, children of whatever parent module contains them both. More to the point, it’s foo_test that’s not a child module of foo, meaning it can only see the public symbols of the latter.

This is not quite enough to write a proper unit test. It definitely isn’t for our initial FizzBuzz example, because the fizzbuzz_string function cannot even be imported!

Existential crises

Okay, so how about we move the mod foo_test; declaration to foo.rs? This should be enough to establish the proper hierarchy. After all, this is how the module tree is normally reconstructed: from the appropriate placement of the mod statements.

So, here we go:

// (foo.rs)

#[cfg(test)]
mod foo_test;
error: cannot declare a new module at this location
  --> src/parent/foo.rs:4:5
   |
 4 | mod foo_test;

…Really?

Well, yes. A declaration like this simply isn’t allowed. The reason for this is actually much less arbitrary than the error message would indicate.

To put it bluntly, foo_test simply cannot exist if it’s introduced there. To deliver on its declaration promise, the submodule would have to reside within foo itself. But of course, foo.rs is just a file, so this setup is evidently impossible.

All in all, Rust seems to be looking for our module in all the wrong places.

Perhaps we can just tell it where it should be going instead?…

The right path

Enter the #[path] attribute, which fulfills this exact purpose:

// (foo.rs)

#[cfg(test)]
#[path = "./foo_test.rs"]
mod foo_test;

#[path] tells the Rust compiler where to look for the module it is attached to. Its argument is relative to the location of the outer module (like foo here), and can be either a single file, or a directory with mod.rs.

Conceptually, this is similar to a custom ClassLoader in Java, or the common sys.path hacks in Python. Unlike those two languages, however, the #[path] attribute is only relevant at compile time.

Additionally, and somewhat confusingly, #[path] can also be applied retroactively to a module that the compiler has already located. In such case, it will affect the lookup of any child modules by making rustc search for them in the new location.


With #[path] handy, it is therefore possible to implement custom layouts of regular source modules and test files.

But like with every tool that can be used to defy conventions, it should be used with the appropriate care. While a straightforward and self-documenting approach described here is unlikely to raise any eyebrows, rewriting module paths willy-nilly is most certainly a bad idea.


  1. Okay, technically it is possible to completely isolate them, essentially by abusing the approach I describe later in this post. 

Continue reading

__all__ and wild imports in Python

Posted on Mon 26 December 2016 in Code • Tagged with Python, modules, imports, testingLeave a comment

An often misunderstood piece of Python import machinery is the __all__ attribute. While it is completely optional, it’s common to see modules with the __all__ list populated explicitly:

__all__ = ['Foo', 'bar']

class Foo(object):
    # ...

def bar():
    # ...

def baz():
    # ...

Before explaining what the real purpose of __all__ is (and how it relates to the titular wild imports), let’s deconstruct some common misconceptions by highlighting what it isn’t:

  • __all__ doesn’t prevent any of the module symbols (functions, classes, etc.) from being directly imported. In our the example, the seemingly omitted baz function (which is not included in __all__), is still perfectly importable by writing from module import baz.

  • Similarly, __all__ doesn’t influence what symbols are included in the results of dir(module) or vars(module). So in the case above, a dir call would result in a ['Foo', 'bar', 'baz'] list, even though 'baz' does not occur in __all__.

In other words, the content of __all__ is more of a convention rather than a strict limitation. Regardless of what you put there, every symbol defined in your module will still be accessible from the outside.

This is a clear reflection of the common policy in Python: assume everyone is a consenting adult, and that visibility controls are not necessary. Without an explicit __all__ list, Python simply puts all of the module “public” symbols there anyway1.

The meaning of it __all__

So, what does __all__ actually effect?

This is neatly summed up in this brief StackOverflow answer. Simply speaking, its purpose is twofold:

  • It tells the readers of the source code — be it humans or automated tools — what’s the conventional public API exposed by the module.

  • It lists names to import when performing the so-called wild import: from module import *.

Because of the default content of __all__ that I mentioned earlier, the public API of a module can also be defined implicitly. Some style guides (like the Google one) are therefore relying on the public and _private naming exclusively. Nevertheless, an explicit __all__ list is still a perfectly valid option, especially considering that no approach offers any form of actual access control.

Import star

The second point, however, has some real runtime significance.

In Python, like in many other languages, it is recommended to be explicit about the exact functions and classes we’re importing. Commonly, the import statement will thus take one of the following forms:

import random
import urllib.parse
from random import randint
from logging import fatal, warning as warn
from urllib.parse import urlparse
# etc.

In each case, it’s easy to see the relevant name being imported. Regardless of the exact syntax and the possible presence of aliasing (as), it’s always the last (qualified) name in the import statement, before a newline or comma.

Contrast this with an import that ends with an asterisk:

from itertools import *

This is called a star or wild import, and it isn’t so straightforward. This is also the reason why using it is generally discouraged, except for some very specific situations.

Why? Because you cannot easily see what exact names are being imported here. For that you’d have to go to the module’s source and — you guessed it — look at the __all__ list2.

Taming the wild

Barring some less important details, the mechanics of import * could therefore be expressed in the following Python (pseudo)code:

import module as __temp
for __name in module:
    globals()[name] = getattr(__temp, __name)
del __temp
del __name

One interesting case to consider is what happens when __all__ contains a wrong name.

What if one of the strings there doesn’t correspond to any name within the module?…

# foo.py
__all__ = ['Foo']

def bar():
    pass

>>> import foo
>>> from foo import *
Traceback (most recent call last):
  File "<stdin>", line 1, in <module>
AttributeError: 'module' object has no attribute 'Foo'

Quite predictably, import * blows up.
Notice, however, that regular import still works.

All in all (ahem), this hints at a cute little trick which is also very self-evident:

__all__ = ['DO_NOT_WILD_IMPORT']

Put this in a Python module, and no one will be able to import * from it!
Much more effective than any lint warning ;-)

Test __all__ the things

Jokes aside, this phenomenon (__all__ with an out-of-place name in it) can also backfire. Especially when reexporting, it’s relatively easy to introduce stray 'name' into __all__: one which doesn’t correspond to any name that’s actually present in the namespace.

If we commit such a mishap, we are inadvertently lying about the public API of our package. What’s worse is that this mistake can propagate through documentation generators, and ultimately mislead our users.

While some linters may be able to catch this, a simple test like this one:

def test_all(self):
    """Test that __all__ contains only names that are actually exported."""
    import yourpackage

    missing = set(n for n in yourpackage.__all__
                  if getattr(yourpackage, n, None) is None)
    self.assertEmpty(
        missing, msg="__all__ contains unresolved names: %s" % (
            ", ".join(missing),))

is a quick & easy way to ensure this never happens.


  1. Public” symbols have names that don’t begin with underscore (_). Of course, “non-public” ones are still accessible but are treated as implicitly unstable & discouraged. 

  2. Or check what symbols there don’t have a leading underscore. 

Continue reading

Simulating exceptions in Rust with IIFE

Posted on Sat 17 December 2016 in Code • Tagged with Rust, IIFE, error handling, exceptions, closures, lambdasLeave a comment

While many languages use exceptions for handling errors, Rust prefers a slightly different, yet very classical approach: return values.

Now, they aren’t exactly the same thing as in C, where the error is indicated by a special value within the same return type. In Rust, the Result enum can neatly separate the two, in similar vein to how ad-hoc tuples in Go do1. But unlike Go, Rust also offers additional facilities for error propagation, including the try! macro and the recently stabilized ? operator. And finally, the Result wrappings can be straightforwardly unpacked, possibly by defaulting to a known safe value.

Some conveniences of exceptions may be hard to pass up, though. The try-catch construct is evidently one of them, and Rust might eventually get it in one form or another. Before that happens, however, there is a trick that can often work as an acceptable substitute.

Many lets

Here’s an example where it can be very useful.

Have a look at the following function. Its purpose is to retrieve a GitHub login of a user who owns a specific gist — a small sample of code posted to the gists.github.com website2.

Let’s assume we have already talked to GitHub API and received the following JSON response from its relevant endpoint:

{
    "id": "12345678",
    "owner": {
        "login": "Octocat",
        ...
    }
    ...
}

Parsing it is easy: we can do it with the rustc_serialize crate, among other options. What proves a little more involved is to dig through the JSON tree in order to reach the interesting value:

use rustc_serialize::json::Json;


/// Retrieve the gist owner from a JSON received from
/// the /gists/$ID endpoint of the GitHub API.
///
/// If the gist is anonymous, "anonymous" is returned.
fn gist_owner_from_info(info: &Json) -> String {
    if let Some(info) = info.as_object() {
        if let Some(owner) = info.get("owner").and_then(|o| o.as_object()) {
            if let Some(result) = owner.get("login").and_then(|l| l.as_string()) {
                return result.to_owned();
            }
        }
    }
    "anonymous".into()
}

Whew! I guess we’re lucky we don’t need to go too deep into that JSON. The code is clearly exhibiting a rightward slant, which some people refer to as the “arrow code”, Unsurprisingly, it is generally considered bad for readability.

There are few other ways of writing this, of course, including a style reminiscent of JavaScript promises — that is, relying completely on the and_then method. Neither seem very satisfying, though, especially if you compare it with something like this:

try:
    return str(info["owner"]["login"])
except (KeyError, TypeError):
    return "anonymous"

Yes, exceptions are quite useful sometimes.

So, how can we get something like this in Rust?

JavaScript for the rescue

Succor comes from an unexpected direction. To emulate exceptions — specifically, the try-catch exception blocks — we can utilize a technique that is most popular in… JavaScript.

At least until recently, JavaScript did not have a block local scope. Since every variable declaration within a function is hoisted to the top of that function, it essentially makes function scope the only usable one (besides global, of course).

As a result, a variety of JavaScript idioms rely on introducing “superfluous” functions, solely for the purpose of creating a nested scope. Many times, those functions are neither named nor stored in any variable; rather, they are immediately invoked.

This is what is commonly understood as Immediately Invoked Function Expression, or IIFE for short.

An oft-cited example involves an IIFE which itself returns another function:

for (var i = 0; i < 10; ++i) {
    var $para = $("p#" + i);  // <p id="0">, <p id="1">, etc.
    var clickHandler = (function(i) {  // IIFE!
        return function() {
            alert("Clicked element no. " + (i + 1));
        };
    })(i);
    $para.on('click', clickHandler);
}

The function expression is necessary here, because it allows to control what exactly goes into the closure of the inner function. If the clickHandlers were assigned the function() { alert(...) } expression directly, they would all close over the same loop counter variable. All would then display the exact same message.

We don’t need to employ those workarounds in Rust. Thanks to local scoping, a simple pair of { braces } would work exactly the same. You can imagine a direct rewrite of the above example, though, where an anonymous closure is used to similar effect:

// WARNING: Not idiomatic! (Also not a real DOM library).

for i in (0..10) {
    let para = dom.find_element_by_id("p", i.to_string()).unwrap();
    let click_handler = |i| {
        move |_: Event| { dom.exec_js(&format!(
            "alert('Clicked element no. #{}');", i + 1)); }
    }(i);
    para.add_event_listener(Event::Click, click_handler)
}

In other words, Rust supports IIFEs just fine.

Just put a function on it

Okay, this is quite amusing and probably pretty neat. But does it help us with the error handling story exactly?…

Let’s take another stab at rewriting the gist_owner_from_info routine. This time, we’ll extract the meaty part into a separate function. We will also take advantage of one trivial, but very useful try_opt crate which is essentially an equivalent of the try! macro for Options:

#[macro_use] extern crate try_opt;

fn gist_owner_from_info(info: &Json) -> String {
    gist_owner_from_info_internal(info).unwrap_or("anonymous".into())
}

fn gist_owner_from_info_internal(info: &Json) -> Option<String> {
    let info = try_opt!(info.as_object());
    let owner = try_opt!(info.get("owner").and_then(|o| o.as_object()));
    let login = try_opt!(owner.get("login").and_then(|l| l.as_string()));
    Some(login.to_owned())
}

Now this should be a little easier on the eyes. (And if you want, you can eschew and_then completely in favor of more try_opt!).

The downside is that we now have this _internal function that’s awkwardly sticking out. We could pull it in, and turn it into an inner function, but why stop half-way? Let’s just make it an IIFE already:

fn gist_owner_from_info(info: &Json) -> String {
    || -> Option<String> {
        let info = try_opt!(info.as_object());
        let owner = try_opt!(info.get("owner").and_then(|o| o.as_object()));
        let login = try_opt!(owner.get("login").and_then(|l| l.as_string()));
        Some(login.to_owned())
    }().unwrap_or("anonymous".into())
}

Not bad, eh? The analogies with exception handling should be pretty evident, too3:

  • The closure itself works as a try block, with closure’s body containing the “guarded” code.
  • The unwrap family of methods (especially unwrap_or_else) dubs for a catch/except section.

Sure, we do need try! (or try_opt!) macros to mark instructions that may “throw an exception”, but with the ?-based syntax it shouldn’t be too big of a deal. And when the time comes, this code will be very easy to port to a trait-based exception handling solution that’s currently in the works.

Oh, and the best part? Both Rust and the underlying LLVM are very adept at inlining closures, so everything here should compile to optimal code.

Bonus: a lifetime conundrum

Well, almost optimal. There is one more thing left to do before we can call this a truly zero-cost abstraction.

We need to stop allocating so damn much!

It should be pretty obvious that the function doesn’t need to create a brand new String every time it’s called. The text is in the input Json, and we take that Json by reference already. It’s only fair we stop creating Strings and simply return a &str reference instead.

In fact, this should be as easy as removing the to_owned/into calls, right?

fn gist_owner_from_info(info: &Json) -> &str {
    || -> Option<&str> {
        let info = try_opt!(info.as_object());
        let owner = try_opt!(info.get("owner").and_then(|o| o.as_object()));
        owner.get("login").and_then(|l| l.as_string()))
    }().unwrap_or("anonymous")
}

Wrong, apparently. If you present this code to the compiler, it will serve you quite a mouthful of an error, including helpful tidbits in the vein of “expected A, found A”:

error[E0495]: cannot infer an appropriate lifetime for autoref due to conflicting requirements
   --> src/github.rs:3:34
    |
  3 |         let info = try_opt!(info.as_object());
    |                                  ^^^^^^^^^
    |
note: first, the lifetime cannot outlive the anonymous lifetime #1 defined on the block at 1:45...
   --> src/github.rs:1:46
    |
  1 | fn gist_owner_from_info(info: &Json) -> &str {
    |                                              ^
note: ...so that reference does not outlive borrowed content
   --> src/github.rs:3:29
    |
  3 |         let info = try_opt!(info.as_object());
    |                             ^^^^
note: but, the lifetime must be valid for the anonymous lifetime #1 defined on the block at 2:23...
   --> src/github.rs:2:24
    |
  2 |     || -> Option<&str> {
    |                        ^
note: ...so that expression is assignable (expected std::option::Option<&str>, found std::option::Option<&str>)
   --> src/github.rs:5:9
    |
  5 |         owner.get("login").and_then(|l| l.as_string())
    |

The crux of this verbiage is that the Rust compiler is unable to reconcile the lifetime of the closure’s return value, the input, and final result of the function.

It shouldn’t really be trying very hard, though, for the lifetime is obvious. It’s the same as the one implicitly attached to the input &Json. Seems like in this case, we need to be a little more helpful and label it explicitly:

fn gist_owner_from_info<'i>(info: &'i Json) -> &'i str {
    || -> Option<&'i str> {
// (rest as before)

Voila, this should now compile without any issues.

Once again, “Keep calm and add more 'lifetimes” proves to be an effective approach ;)


  1. Technically, they aren’t called tuples there but “multiple return values“. 

  2. This is something I needed to do when rewriting this Python project of mine to Rust. 

  3. This is also the closest Rust can currently get to a do notation from Haskell, at least without any macro-based hacks. 

Continue reading

Optional arguments in Rust 1.12

Posted on Thu 29 September 2016 in Code • Tagged with Rust, arguments, parameters, functionsLeave a comment

Today’s announcement of Rust 1.12 contains, among other things, this innocous little tidbit:

Option implements From for its contained type

If you’re not very familiar with it, From is a basic converstion trait which any Rust type can implement. By doing so, it defines how to create its values from some other type — hence its name.

Perhaps the most widespread application of this trait (and its from method) is allocating owned String objects from literal str values:

let hello = String::from("Hello, world!");

What the change above means is that we can do similar thing with the Option type:

let maybe_int = Option::from(42);

At a first glance, this doesn’t look like a big deal at all. For one, this syntax is much more wordy than the traditional Some(42), so it’s not very clear what benefits it offers.

But this first impression is rather deceptive. In many cases, this change can actually reduce the number of times we have to type Some(x), allowing us to replace it with just x. That’s because this new impl brings Rust quite a bit closer to having optional function arguments as a first class feature in the language.

Until now, a function defined like this:

fn maybe_plus_5(x: Option<i32>) -> i32 {
    x.unwrap_or(0) + 5
}

was the closest Rust had to default argument values. While this works perfectly — and is bolstered by compile-time checks! — callers are unfortunately required to build the Option objects manually:

let _ = maybe_plus_5(Some(42));  // OK
let _ = maybe_plus_5(None);      // OK
let _ = maybe_plus_5(42);        // error!

After Option<T> implements From<T>, however, this can change for the better. Much better, in fact, for the last line above can be made valid. All that is necessary is to take advantage of this new impl in the function definition:

fn maybe_plus_5<T>(x: T) -> i32 where Option<i32>: From<T> {
    Option::from(x).unwrap_or(0) + 5
}

Unfortunately, this results in quite a bit of complexity, up to and including the where clause: a telltale sign of convoluted, generic code. Still, this trade-off may be well worth it, as a function defined once can be called many times throughout the code base, and possibly across multiple crates if it’s a part of the public API.

But we can do better than this. Indeed, using the From trait to constrain argument types is just complicating things for no good reason. What we should so instead is use the symmetrical trait, Into, and take advantage of its standard impl:

impl<T, U> Into<U> for T where U: From<T>

Once we translate it to the Option case (now that Option<T> implements From<T>), we can switch the trait bounds around and get rid of the where clause completely:

fn maybe_plus_5<T: Into<Option<i32>>>(x: T) -> i32 {
    x.into().unwrap_or(0) + 5
}

As a small bonus, the function body has also gotten a little simpler.


So, should you go wild and change all your functions taking Optionals to look like this?… Well, technically you can, although the benefits may not outweigh the downsides for small, private functions that are called infrequently.

On the other hand, if you can afford to only support Rust 1.12 and up, this technique can make it much more pleasant to use the external API of your crates.

What’s best is the full backward compatibility with any callers that still pass Some(x): for them, the old syntax will continue to work exactly like before. Also note that the Rust compiler is smart about eliding the no-op conversion calls like the Into::into above, so you shouldn’t observe any changes in the performance department either.

And who knows, maybe at some point Rust makes the final leap, and allows skipping the Nones?…

Continue reading

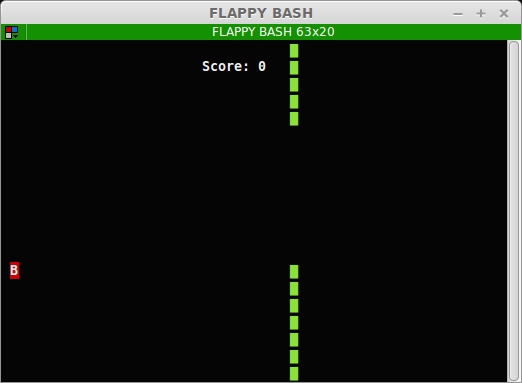
Flappy Bird in 1234 bytes of Bash

Posted on Thu 25 August 2016 in Code • Tagged with Bash, shell scripting, game programming, Flappy BirdLeave a comment

Contrary to an infamous opinion from a bygone era, 640KB is not really sufficient for anyone anymore. A typical website exceeds that easily, and executable programs are usually measured in megabytes.

But what if you only had 1234 bytes to work with?…

A friend of mine, Gynvael Coldwind, organized a game programming compo1 that had precisely this limitation. Unlike most demoscene ones, however, the size limit here applies to either the final binary or its source code. This can be chosen at the participant’s discretion.

Since my currently favorite compiled language produces the exact opposite of small binaries, I was quite intrigued by the source code option. But as the rules say, the final game must run on a clean installation (only standard packages) of either Windows or Ubuntu Linux. The choice of viable languages and technologies was therefore rather limited.

It was time to get a little creative.

Game theory

What must an environment provide to be a suitable platform for game development? Not much, really. We only need to be able to:

  • put stuff on the screen
  • react to user input
  • execute time-dependent logic

You could arguably get away without the last one, but the kind of games you would end up with had gone out of fashion about half a century ago. For the “real” arcade games, we really ought to run our code at least a dozen times per second.

There’s only a handful of standard technologies that allow all of this out of the box.

I’m a wee bit out of touch with Windows these days but on Linux, there’s one thing that I really wanted to take for a serious spin. And luckily for me, it also has one extremely terse language to go hand in hand with.

I’m talking, of course, about the ANSI terminal that can be scripted in Bash. If there ever was anything that worked anywhere by default, then this got to be it2.

…put into practice

Note that I’ve stressed the “terminal” part. The shell itself is a neat instrument, but (perhaps surprisingly) it doesn’t actually concern itself with displaying anything on the screen.

This has traditionally been the job of a terminal emulator. To this end, it has a couple of special codes that are undoubtedly useful for an aspiring indie shell game developer. They are what allows us to display things in a specific position on the screen, complete with chosen color, background color, and (text) style.

So this nails down our first requisite feature.

As for the second one, the vanilla read command supports everything we may need for handling user input. The only real “trick” is passing the -n flag which makes it wait for a specific number of characters (e.g. one) rather than a whole line ending with Enter. Add a few more flags — like the one that prevents text from being echoed back to the console — and you can make a rudimentary input loop:

KEY='\0'
while :; do
    read -rsn 1 KEY
done

I can imagine, however, that you’d want to do other things besides just waiting for input. Stuff like “updating the game state” and “drawing the next frame” is generally considered pretty important in games.

Normally, we would deal with those things in between checking for input events, leading to a particular structure of the so-called real-time loop.

But the shell doesn’t really handle input via “events”. Instead, you just ask for some text and wait until you get it. There is no “peek mode” that’d allow to squeeze in some rendering logic before the next key press.

What do we do, then, with a tight loop that leaves us no wiggle room?…

Why, we take a crowbar and pry it open!

(Don’t) be alarmed

Let’s start by noticing that to run some code whenever there is nothing else to do has a rough equivalent of running it periodically. This isn’t an exactly new observation: the setTimeout function in JavaScript has been the basis of “real-time” animation since the 90s era of falling snowflakes, and up to the contemporary browser games3.

Neither does the shell nor the hosting terminal support anything like setTimeout, though. But fortunately, they don’t need to: Linux itself does. And it accomplishes it quite effortlessly, due to the sole fact of being an operating system. All we have to do is access some of its capabilities directly from the shell script:

KEY='\0'
DT=0.05  # timeout value in seconds

tick() {
    # .. do stuff ...
    ( sleep $DT; kill ALRM $$ )&
}

trap tick ALRM
tick
while :; do
    read -rsn 1 KEY
done

What we’re doing here is set up the tick function to be a signal handler. A callback, if you will.

Inside of this callback, we can do all the state updates and drawing we need, as long as we follow it with “scheduling” of the next tick call. As a direct equivalent of a setTimeout invocation, this can be done by:

  • starting a subshell to run in the background (with &)
  • letting it sleep for however long we want to delay the next update
  • sending a signal to the main script (kill $$)

The signal we chose is of course SIGALRM4. Technically, however, it can be anything, as long as we can set up a trap to actually handle it.

In any case, success! Bash is officially a game programming platform!

Integration in parts

And so having figured out the technicalities, I was faced with the crucial dilemma: what game could I actually write?

Nothing too complicated, that’s for sure. After the initial scaffolding has used up about 1/4 of the harsh size limit, I knew that radical simplicity was the order of the day.

And so I went for possibly the most trivial game ever.

flap flap
Sorry, Pong!

Then, after hours of (ahem) meticulous research, I managed to reverse-engineer the core mechanic:

  • let the bird fall down with a constant acceleration
  • to jump, give it some upwards-facing velocity

Actually coding this in Bash was mostly a matter of finding out how to perform floating-point calculations. Rather unsurprisingly, this is done through an external program, while truncating of the fractional part involves — wait for it — string formatting.

Pipe dream

Based on the above nuggets of Stack Overflow wisdom, you’ve probably figured out that Bash isn’t exactly what you would call a programming language. With a little bit of perseverance, however, we can make it do our bidding… some fraction of the time.

So far, I had the player character — a beautiful red rectangle — fall down under the constant force of gravity, and maybe ascend if the Space key has been pressed. But a heroic protagonist necessitates the presence of formidable adversaries, so my next step was to figure out how to implement this crucial gameplay mechanic.

Which one?… Pipes, of course.

Pipes in Bash.

...ahem

It was pretty evident I’m gonna need to represent them somehow, and Bash isn’t exactly known for its strong repertoire of data structures. Starting from version 4.0, it does however have arrays, so there is at least something we can work with.

Let’s not get too carried away, though. The somewhat obvious idea of mirroring the entire game field in a (pseudo) 2D array of pipe/not-pipe turned out to be completely unworkable. The fill rate of most (all?) terminal emulators is nowhere near sufficient to permit redrawing of the whole screen and maintaining FPS value above the slideshow threshold.

What I went with instead was a 1D array for the pipe itself, and a separate variable to denote its horizontal position. Working from there, it wasn’t too hard to make it move, and eventually to check for its collision with the player object.

Fitting in

That, of course, was the most important milestone.
I added an objective.
It was an actual game.

And I still had about 100 bytes left!

Speaking of size, this is probably a good moment to talk about making the most of those meager 1234 bytes. It’s not exactly surprising that it was possible mostly thanks to minification.

While it’s extremely popular for JavaScript, the same abundance of minification utilities cannot be expected when it comes of shell scripts. Still, “bash minification” does return some useful search results, and one of them is what I used to shrink the final script.

Obviously, it didn’t go without some trouble. Since the minifier does little more than to swap newlines for semicolons, it got a few bugs that had to be ironed out. No big deal, really: a small batch of handcrafted, artisanal Python was enough to paper over the issues.

The other technique you can use to slim down is obfuscation, i.e. shortening of the identifiers. As the minifier didn’t offer this feature natively, I had to take care of it myself.

This lead to adding such interesting assignments as this p:

p=printf

which absolutely shouldn’t be confused with this p:

# put text at given position: p $x $y $text
p() { echo -en "\e[$2;${1}f$3"; }

The reason it works is that in POSIX shells, variables and functions effectively form two separate namespaces. Their members are thus referred to in two different ways:

p $X $Y "\e[1;37;41mB"  # call the p() function
$p "\e[?25l"  # expand the p variable (i.e. call `printf`)

Notice how functions have longer definitions but shorter usage, while the opposite is true for variables. Who can now say that Bash doesn’t find balance in all things?

Auditory sensations

Like I mentioned before, thanks to those and similar tricks I had managed to carve out about a hundred or so bytes of free space.

Now, what could you possibly do with such a staggering amount?

Two tweets at the same time!
…no, that won’t even be one tweet.

Well, let’s add some sound effects, shall we?

Before you think that’s preposterous, remember the terminal bell. Sounding the bell is as simple as printing the "\a" character (ASCII 7), which for this reason is also known as BEL:

echo -e "\a"

Unfortunately, most terminal emulators silence the actual sound, and replace it with a visual indicator — typically a bell icon. If we want to make speakers reliably emit audible phenomena, we sadly have to look elsewhere.

Fortunately, modern Linux systems handle the sound card somewhat better than you may have remembered from a few years ago. This is usually thanks to ALSA, a dedicated subsystem in the Linux kernel, and its numerous userspace complements.

One of them is the inconspicuous speaker-test binary which, well, does exactly what it says on the can:

speaker-test  # play some noise through the speakers

You can make it play a WAV file, too, but the most interesting option is to synthesize a sine wave. By adjusting its frequency, it’s easy to play higher and lower tones, forming the building blocks for more complex sounds.

What you cannot control is the tone’s duration. That’s not a big problem, though, since we can run speaker-test in a separate process and then just kill it dead:

# play a sine wave (requires ALSA): s $frequency $duration
s() { ( speaker-test >$n -t sine -f $1 )& _p=$!; sleep $2; kill -9 $_p; }

I’ve used this approach to play a simple, two-tone sound whenever the player successfully overcomes a pipe obstacle. And I would’ve probably taken it further if “speaker_test” wasn’t such a damn long string. Unfortunately, it was one identifier I couldn’t afford to shorten, and this had put a stop to my ambitious plan of improvising a sad trombone upon player’s failure :(

; done

It wouldn’t be right to say I wasn’t very happy with the results, though. All in all, it was the most fun I had with coding in quite some time, and definitely the most amusing Bash script I’ve ever written.

FLAPPY BASH

It also got me curious what other games people have implemented purely as shell scripts. To my disappointment, there hadn’t been all that many. Of those I could find, this Snake clone in about 7KB of (unobfuscated) Bash is probably the most polished one.

As you can see then, this is clearly an under-appreciated platform that evidently displays a lot of potential! If you want to create games that are both very portable and extremely space-efficient, Bash is definitely a technology you should have a closer look at ;-)


  1. Here’s the original announcement post in Polish and its somewhat understandable Google-translated version

  2. Yes, I’m ignoring the elephant in the room which is the web browser. It’s probably because a pile of minified JavaScript doesn’t strike me as very interesting anymore :) 

  3. Nowadays, though, the requestAnimationFrame function is closer to the actual continuous processing in the background. 

  4. Regular programs could simply call the alarm function instead of forking a subprocess. But then again, regular programs could just run a normal game loop. 

Continue reading

The brave “new” world of Python 3

Posted on Mon 15 August 2016 in Code • Tagged with Python, Python 3, Unicode, lazy evaluation, iterablesLeave a comment

I’ll blurt it straight up: I’m not a big fan of Python 3.

For a long time, I resisted the appeal of various incremental improvements that early 3.x releases offered. And the world agreed with me: a mere two years ago, Python 3 wasn’t even a blip on the PyPI radar.

Lately, however, things seem to be picking up some steam.

As if to compensate for years of “good enough”, Python 3 development team has given in to a steadily accelerating feature creep. Sure, some of it results in bad ideas (or even ideas you’d hope are jokes), but it nevertheless causes an increasingly wide functional gap between the 2.x and 3.x series.

Starting from around Python 3.5, this gap becomes really noticeable, even when partially bridged with many excellent backports. The ecosystem support is also mostly there, at least insofar as “not breaking horribly when a package is used in Python 3”.

And then, of course, there is the 2.7 EoL date looming ever closer.

Given all those portents, even old curmudg… ahem… seasoned developers cannot really ignore Python 3 anymore. For better or for worse, 3.x is how Python will look like in the coming years and decades. Might as well prepare for it.

In this post, I will discuss some important issues one should be aware of before trying to switch from Python 2 to 3. I won’t be talking about all the minute changes and additions, but cover the more significant, broader concepts that mark the divide between the 2.x and 3.x generations.

The two concepts I’ll be mentioning here are Unicode (obviously) and lazy vs. eager computation.

Unicode handling

You have probably heard it before. Python 3 was going to solve your Unicode problems once and for all. You haven’t believed it, of course, like you wouldn’t believe in any other silver bullet.

Still, it may be rather surprising to learn that in Python 3, you’ll actually see much more Unicode-related errors.

And strange as it may sound, it is a good thing.

In any case, either version of Python gets the most important thing about Unicode right. They both distinguish, at the type level, between strings (of Unicode codepoints) and their encodings (sequences of bytes). The type that holds the latter is called bytes in both versions, while strings are stored within the str type in Python 3 and unicode in Python 2.

It is from this crucial distinction — or rather, failing to account for it — where all the dreaded Unicode errors ultimately stem.

But where Python 2 does poorly is in the choice of defaults. You probably know all too well that bytes there is just an alias for str. That str is a fully functional string type, even though it can only contain ASCII characters. Moreover, it is also the default: quoted string literals, for example, will be of this type unless specially marked.

This poor choice of defaults is the primary source of latent Unicode bugs in Python 2 programs.

What Python 3 does here is to help expose those bugs sooner. If you already deal with Unicode correctly in your programs — maybe because you watched this excellent talk by Ned Batchelder — your main benefit will be not having to write that u"" quotes anymore. Otherwise, it’ll force you to consider the issue from the very beginning, rather than letting you write “working” programs that crash the moment they have to process some non-ASCII input.

Laziness by default

The second major change that Python 3 brings is of similar nature. It is also a change of defaults, but the impetus for it is much less evident.

What’s different in Python 3 is that many built-in functions and methods which used to return lists are now giving out bespoke objects that only mostly behave like lists. Included in these are functions like map or filter, as well as common dictionary methods such as keys or values.

This change is usually presented as removal of unnecessary cruft:

  • itertools.ifilter is now just filter
  • xrange is now just range
  • dict.iteritems is now just dict.items

and so on.

In some cases, this is exactly what happens. For example, there is virtually no downside to the new implementation of range, especially considering the way it is used most often.

But not every built-in managed to preserve all the functionality of lists. Indeed, many have downgraded their API guaratees to those of mere generators, i.e. the most simplistic and limited flavor of Python iterables. Working with them is trickier and more error-prone than with lists, which is due to various pitfalls that generators expose us to.

Navigating around those gotchas used to be something that Python code had to opt-in to, by explicitly importing the itertools module and using its functions in place of the built-ins. What you could gain in return was increased performance, and a lesser memory footprint. All those benefits came from making the computations lazy and refraining from storage of the intermediate results.

In Python 3, however, laziness is preordained. Even if we don’t need or care about the aforementioned perks, we have to devise some way of dealing with the pervasive generators.

One option is to embrace lazy evaluation fully, and adapt to handling unspecified iterables throughout our code bases.
The risk is an increased frequency of bugs stemming from generator misuse — including a common mistake of trying to iterate over lazy foos the second time, deeper down a long function, after it’s been already exhausted.

The alternative is to engage in a lot of “defensive listing”: wrapping of unknown (or known-but-lazy) iterables in list() calls in order to “sanitize” them for later (re)use.
Examples include immediate listification of a generator object:

primes = list(filter(is_prime, range(1000)))

or preemptive conversion of an incoming iterable argument:

def do_something(foos):
    foos = list(foos)
    # ...the rest of a long function...

Even if you choose the first path, and somehow use lazy generators everywhere, conversions are still required at the serialization boundaries:

d = {'foo': 42}
json.dumps({'keys': d.keys()})  # TypeError: dict_keys(['foo']) is not JSON serializable
json.dumps({'keys': list(d.keys())})  # works

At least in this case, the lazy iterable will vocally fail with an exception, rather than silently doing nothing (in case of repeated iteration) or always posing as truthy even when it’s empty (in if iterable: checks).

from __future__ import doubts

So, here they are: the highlights of Python 3. If you are disappointed they all turned out to be mixed blessings, don’t worry: you are in a good company.

The truth is that Python 3 is more finnicky, less forgiving, and much less beginner-friendly than its predecessor. Its various superficial simplifications are almost squarely balanced by many new concerns that are thrust upon an unsuspecting programmer from the very beginning.

In one possible view, this is simply a sign that the language has matured. Perhaps it’s not a coincidence that almost exactly 18 years has passed between the first public version of Python (0.9) and the release of Python 3.0. By no conceivable means it is a toy language anymore, and it’s adequately equipped to tackle challenges presented by the computing world of today.

But on the other hand, it’s clear something is being gradually lost in the process.

It’s becoming harder to claim the language favors simplicity over complexity.
It is no longer so easy to pick which way is the obvious way to do it.
It is increasingly often that ugly replaces beautiful and nested replaces flat.

Little by little, Python itself is becoming less and less pythonic. The pace isn’t breakneck, but it’s definitely noticeable. But who knows? Maybe after two decades, a wholesale redefinition of the language’s core principles really is in order.

…Well, certainly that’s necessary if some of the latest ideas are about to get in!

Continue reading